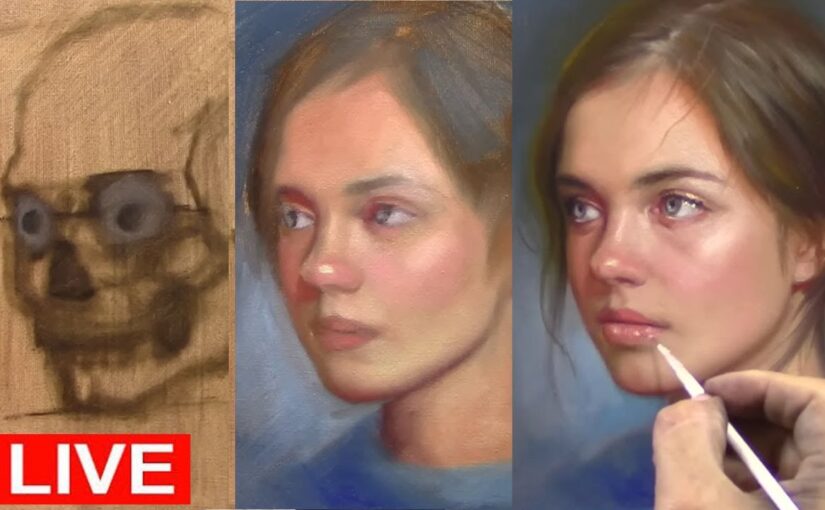
Creating a realistic portrait is more than just capturing the surface features—it’s about understanding what lies beneath. As an artist, studying the anatomy of the face is crucial for achieving accuracy, depth, and realism in your work. Recently, I painted an oil portrait starting with a detailed skull drawing and building the face on top. This process reminded me how essential facial anatomy is to creating lifelike art. In this article, we’ll explore the key elements of facial anatomy and how you can use this knowledge to improve your portraits.
Why Study the Anatomy of the face?
Understanding the anatomy of the face allows you to:
- Create Realistic Proportions: Knowing the underlying structure helps you place features correctly.
- Add Depth and Dimension: By visualizing the bones and muscles, you can better depict light, shadow, and form.
- Capture Expressions: Muscles are responsible for facial movements, so understanding them helps you convey emotion.
- Build Confidence: When you know what’s beneath the skin, you can paint or draw with greater accuracy and intention.
The Foundation: The Skull
The skull is the framework of the face. Its shape determines the overall structure, proportions, and placement of facial features. Here are the key parts of the skull to focus on:
- Cranium: The rounded top part of the skull that houses the brain.
- Orbit (Eye Sockets): The hollow spaces where the eyes sit. Their shape affects the appearance of the eyes and eyebrows.
- Nasal Cavity: The bony structure that supports the nose.
- Zygomatic Bones (Cheekbones): These bones create the prominence of the cheeks.
- Maxilla and Mandible (Upper and Lower Jaw): These bones define the shape of the mouth and chin.
When starting a portrait, sketching the skull first can help you establish the correct proportions and placement of features.
The Muscles of the Face
The muscles of the face are responsible for expressions and give the face its shape and movement. Here are the most important ones for artists to know:
- Frontalis: Located in the forehead, this muscle raises the eyebrows and creates horizontal lines.
- Orbicularis Oculi: Surrounds the eyes and controls blinking and squinting.
- Zygomaticus Major and Minor: These muscles pull the corners of the mouth upward, creating a smile.
- Orbicularis Oris: Encircles the mouth and controls lip movements like puckering or closing.
- Masseter: A strong muscle in the jaw that helps with chewing and defines the jawline.
- Buccinator: Located in the cheeks, this muscle helps with chewing and creates the rounded shape of the cheeks.
Understanding these muscles helps you depict expressions and add realism to your portraits.
Key Features and Their Anatomy
Let’s break down the major facial features and their underlying anatomy:
Eyes
- The eyes sit within the orbits (eye sockets) and are protected by the eyelids.
- The eyeball itself is spherical, but only a portion is visible.
- The eyelids have thickness and cast shadows, which are important to capture.
Nose
- The nose is supported by the nasal bones and cartilage.
- The bridge of the nose is bony, while the tip and nostrils are softer and more flexible.
- Shadows under the nose and along the sides are key to creating depth.
Mouth
- The mouth is shaped by the orbicularis oris muscle and supported by the teeth and jaw.
- The upper lip often has a slight “M” shape, while the lower lip is fuller.
- Pay attention to the philtrum (the groove above the upper lip) and the shadows around the mouth.
Ears
- The ears are made up of cartilage and have a complex shape with ridges and folds.
- They align with the brow line at the top and the base of the nose at the bottom.
How to Practice Facial Anatomy
- Study the Skull
Draw or paint the skull from different angles to understand its structure. - Observe Muscle Movement
Watch how facial expressions change the shape of the face. Use a mirror or reference photos. - Layer Your Work
Start with a skull sketch, then add muscles, and finally build the skin and features on top. - Use Anatomical References
Invest in anatomy books or use online resources to study the face in detail. - Practice Consistently
Incorporate anatomical studies into your regular art practice.
Applying Anatomy in Your Art
When I painted my recent oil portrait, I began with a skull drawing. This helped me establish the proportions and placement of the features. As I added layers of paint, I kept the underlying anatomy in mind, ensuring that the face had depth and structure.
Here are some tips for applying the anatomy of the face in your work:
- Start with the Skull: Use it as a guide for proportions and feature placement.
- Visualize the Muscles: Think about how they shape the face and create expressions.
- Focus on Shadows and Highlights: Use light to emphasize the three-dimensional structure of the face.
- Keep Practicing: The more you study anatomy, the more intuitive it will become.
Conclusion
The anatomy of the face is the foundation of great portraiture. By understanding the skull, muscles, and features, you can create artwork that is not only accurate but also full of life and emotion. Whether you’re painting in oils, drawing, or sculpting, taking the time to study anatomy will elevate your art to the next level.
So, grab your sketchbook, study those bones and muscles, and watch your portraits come to life! 🎨✨
- The Art of Portrait Painting – A Journey of Light, Color, and Patience
- Mastering Oil Painting: A Step-by-Step Guide to Creating a Realistic Portrait
- The Art of Portrait Painting – Capturing Scarlett Johansson’s Essence
- The Art of Capturing Softness – A Portrait Painting Journey
- A Journey Through Art: Painting a Portrait with Renso Art