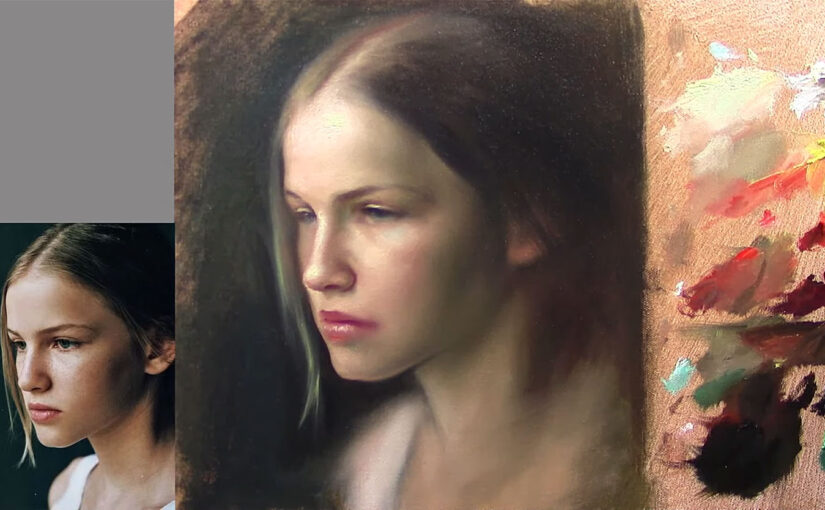
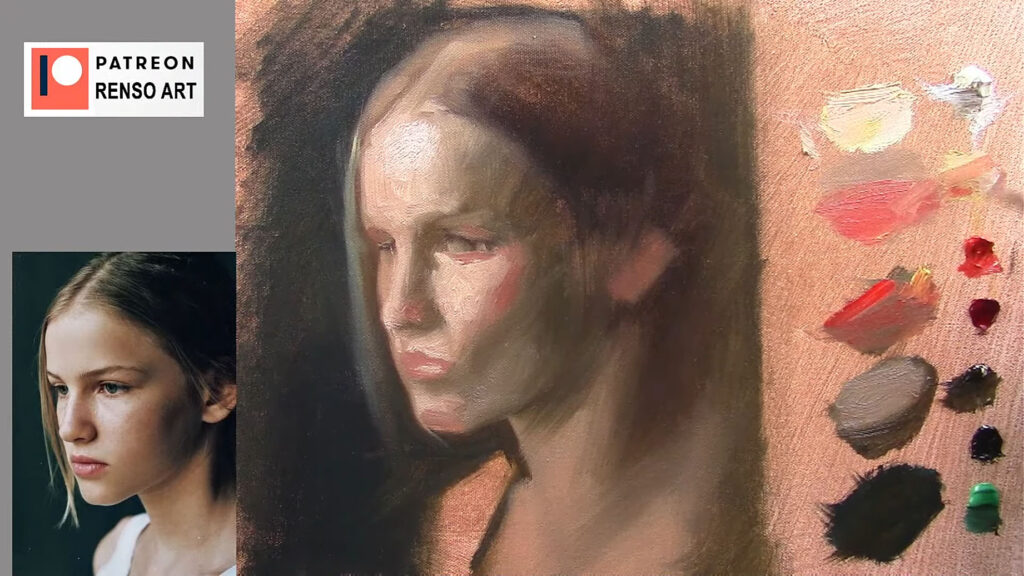
When it comes to painting a portrait in oils, one of the most overlooked yet essential skills is mastering edges. Edges refer to the transitions between shapes, colors, and values in your painting. They can be hard, soft, or lost, and how you handle them can make or break the realism of your portrait. Hard edges draw attention and create focus, while soft edges suggest depth and subtlety. Lost edges, where two shapes blend seamlessly, can add mystery and atmosphere.
In this blog post, we’ll explore why edges are so important in portrait painting, how to identify and control them, and practical tips for using them to create lifelike, dynamic portraits. Plus, don’t forget to watch the accompanying video demo, where I’ll walk you through the process of painting a portrait with a focus on mastering edges!
Why Are Edges Important in Portrait Painting?
Edges play a crucial role in creating realism and guiding the viewer’s eye through your painting. Here’s why they matter:
- They Create Depth and Realism: Hard edges appear closer to the viewer, while soft edges recede into the background. This helps create a sense of three-dimensionality.
- They Direct Focus: Sharp, hard edges draw attention to key areas like the eyes, while soft edges keep less important areas from competing for attention.
- They Add Atmosphere and Mood: Lost edges can create a sense of mystery or softness, adding emotional depth to your portrait.
In the video demo, I’ll show you how to use edges to bring your portrait to life.

Types of Edges in Portrait Painting
Understanding the different types of edges is the first step to mastering them:
- Hard Edges: These are sharp, well-defined transitions between shapes or values. Use them for areas you want to emphasize, like the eyes or the outline of the nose.
- Soft Edges: These are gradual transitions that suggest movement or depth. Use them for areas like the cheeks, where the light gently fades into shadow.
- Lost Edges: These occur when two shapes blend so seamlessly that the edge disappears. Use them to create a sense of unity or to suggest subtle transitions, like where the hair meets the background.
In the video, I demonstrate how to identify and paint each type of edge in a portrait.
How to Control Edges in Oil Painting
Controlling edges in oil painting requires a combination of observation, technique, and practice. Here are some tips to help you master edges:
- Observe Your Reference Carefully: Look for hard, soft, and lost edges in your reference photo or subject. Pay attention to how light and shadow affect the transitions between shapes.
- Use the Right Brushwork:
- For hard edges, use a firm brushstroke with minimal blending.
- For soft edges, use a softer brush and blend gently with a dry brush or your finger.
- For lost edges, allow the colors to blend naturally on the canvas.
- Work from General to Specific: Start with soft edges to establish the overall form, then add hard edges for detail and focus.
- Step Back Frequently: View your painting from a distance to see how the edges are working together. This will help you maintain a balanced composition.
In the video demo, I’ll show you how to apply these techniques step by step.

Common Mistakes to Avoid
- Overusing Hard Edges: Too many hard edges can make your painting look flat and cartoonish. Use them sparingly to emphasize key areas.
- Ignoring Soft Edges: Failing to soften edges where needed can make your portrait look stiff and unnatural.
- Overblending: While soft edges are important, overblending can make your painting look muddy. Use a light touch and let the paint do the work.
Watch the Video Demo!
In the video, I’ll walk you through the entire process of painting a portrait with a focus on mastering edges. You’ll see how I:
- Analyze the reference photo for edge types.
- Block in the portrait with soft edges to establish the overall form.
- Add hard edges to define key features like the eyes, nose, and mouth.
- Use lost edges to create subtle transitions and atmospheric effects.
This demo is perfect for artists of all levels who want to improve their edge control and create more realistic, dynamic portraits.

Tips for Practicing Edges
- Do Edge Studies: Practice painting simple shapes (like spheres or cubes) with different types of edges. This will help you understand how light and shadow affect edges.
- Experiment with Brushwork: Try using different brushes and techniques to create hard, soft, and lost edges.
- Study Master Paintings: Look at how the Old Masters used edges to create depth and realism. Pay attention to how they balanced hard and soft edges in their portraits.

Conclusion
Mastering edges is one of the most powerful tools you can add to your portrait painting toolkit. By understanding how to control hard, soft, and lost edges, you can create portraits that are not only realistic but also full of depth, focus, and emotion.
I hope this blog post and video demo inspire you to focus on edges in your own work. Don’t forget to watch the video to see these concepts in action, and let me know in the comments how you plan to apply these tips to your next portrait!
Happy painting! 🎨✨
- The Art of Portrait Painting – A Journey of Light, Color, and Patience
- Mastering Oil Painting: A Step-by-Step Guide to Creating a Realistic Portrait
- The Art of Portrait Painting – Capturing Scarlett Johansson’s Essence
- The Art of Capturing Softness – A Portrait Painting Journey
- A Journey Through Art: Painting a Portrait with Renso Art